Please note: The forum is now closed to new submissions. All the existing forum topics and posts are still available, however new topics cannot be created. If you need Sinclair C5 advice please use the C5 Owners Facebook Group.

Dan posted:

Those who already have boards (Dave/Marra) if you'd like to post any questions about the 24V board, this is where to put them. Anyone else who is interested in testing the board please read below:

Like before I will be providing the bare board only, I cannot afford to populate it with all the components too.

You must also be happy downloading the software, connecting the Arduino's to a Windows PC via USB and uploading the software to the boards. All software is free!

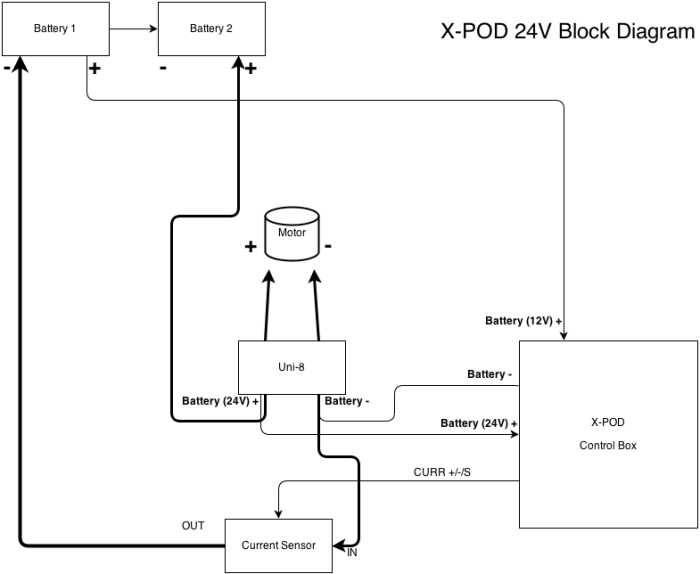
There are a lot of components you will be required to purchase (some of them expensive) and put together. For a complete component list please see the 24V touch project documentation.

You will also need to add various connectors to your existing C5 wires such as handlebar switch, indicator switch, indicator lights, main lights etc as these all need to be connected to the circuit board.

By requesting to enroll in the BETA program you agree to the following:

1. You understand this is a module still in the testing process and that it may or may not function as specified.

2. Using this module in your C5 is entirely at your own risk. Whilst every effort has been made to ensure the module works as specified, C5owners.com will not be held responsible for your use of this module in your C5.

BETA SOFTWARE DISCLAIMER
THE BETA SOFTWARE LICENSED HEREUNDER, PRIMARY PURPOSE OF THIS BETA TESTING LICENSE IS TO OBTAIN FEEDBACK ON SOFTWARE PERFORMANCE AND THE IDENTIFICATION OF DEFECTS. THE LICENSEE IS ADVISED TO USE CAUTION AND NOT TO RELY IN ANY WAY ON THE CORRECT FUNCTIONING OR PERFORMANCE OF THE SOFTWARE AND/OR ACCOMPANYING MATERIALS.

If you agree to the above and want to participate then register your interest below.

Thanks!

Dan

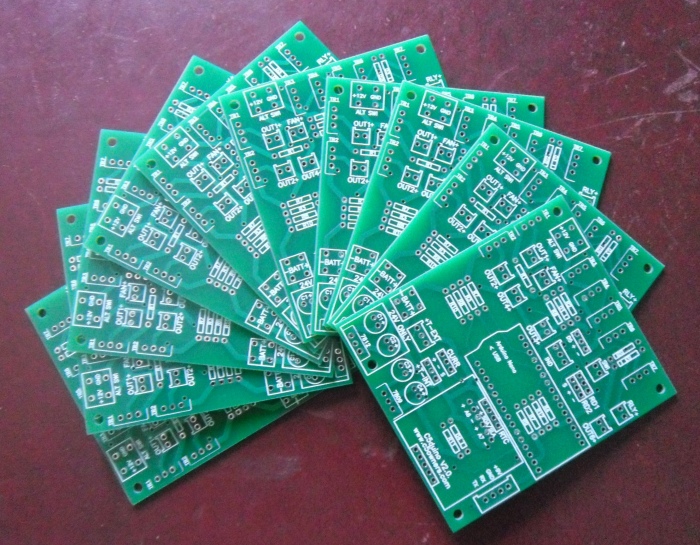
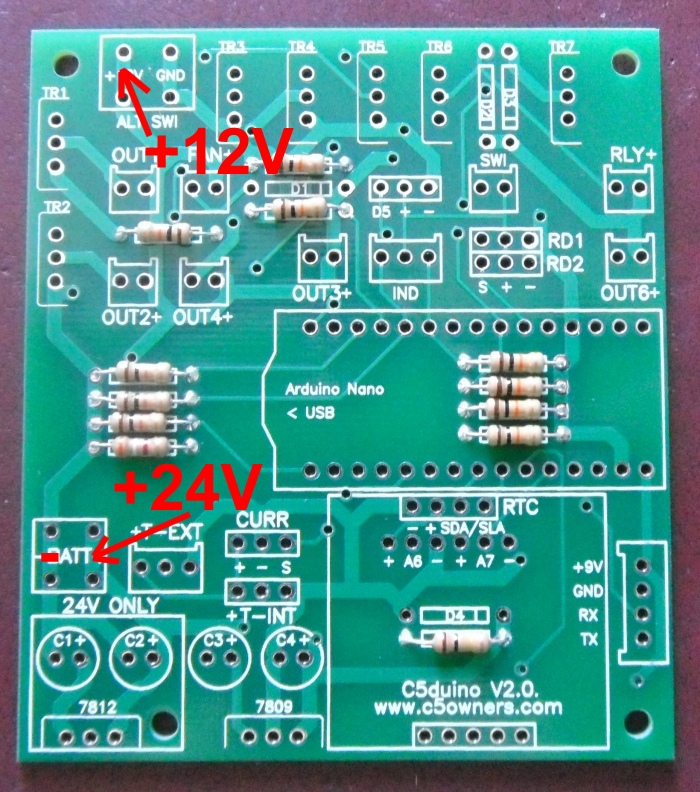
You will receive one of these bare boards:


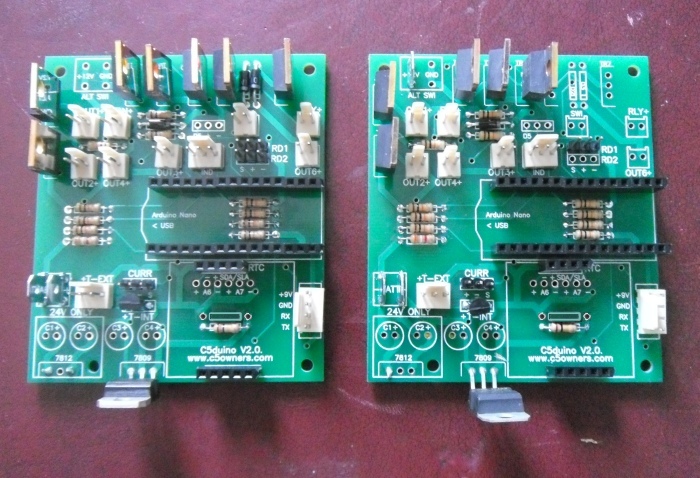
This is what you need to purchase and solder to the board (Left: 12V version, Right: 24V version):


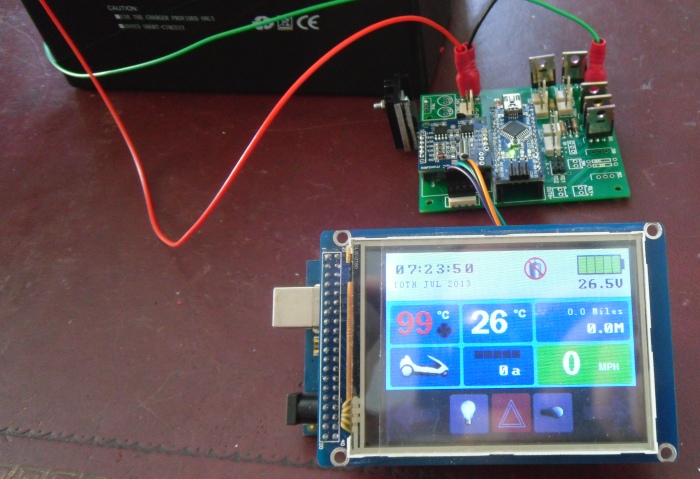
You need to buy the screen too. Details about what to get and how to wire it can be found here:

posted on: 19/07/2013 06:15:30

dave posted:

On the 12 v board there's 6 mosfets and 5 on the 24 v board ? If I put a on /off button on the 1 12 v plus input onthe boardthat would turn it on and off ?
posted on: 19/07/2013 21:13:36

Dan posted:

On the 12 v board there's 6 mosfets and 5 on the 24 v board ?


On the picture above there is actually 7 mosfets on the 12V board. The one in TR7 is there but is unused, I may make use of it in the future. The other additional mosfet is to turn the relay on/off, as there isn't one on the 24v board you don't need one unless you wanted to wire something to it that would then be activated by the handlebar switch?

If I put a on /off button on the 1 12 v plus input onthe boardthat would turn it on and off ?


Yep that's right. On mine I have 2 switches in a bracket under the left side of the C5. One enables 24V and the Uni, and one enables the 12V and the touch board. There's probably a better way of doing it....

You know where to put the battery connections? Here they are fro the 24V board:

posted on: 20/07/2013 06:50:33

dave posted:

On wiring to the screen is it as it is on the board or is tx to rx and rx to tx ? Lol something like that
posted on: 20/07/2013 09:35:52

dave posted:

Wots the c1+ to c4+ used for ? Is there anyway you can download this to your phone as an app and use your smartphone as a screen ? And connect by usb to the nano
posted on: 20/07/2013 09:42:58

Dan posted:

On wiring to the screen is it as it is on the board or is tx to rx and rx to tx ? Lol something like that


Yeah so the comms wiring is always reversed: tx to rx and rx to tx. If you find it not working (the touchscreen stays black) you've got it the wrong way around
posted on: 20/07/2013 09:43:10

Dan posted:

Wots the c1+ to c4+ used for ? Is there anyway you can download this to your phone as an app and use your smartphone as a screen ? And connect by usb to the nano


They were for me when I was testing different configurations.

I was thinking about hooking it up to a smartphone. The problem is you need be be an iOS programmer, something that I am not nor do I have the money to buy the necessary mac hardware to build an iOS app and then spend months getting it into the Apple app store

Android is easier, I've built an Android game app before but it's all down to time, of which I have little Besides, what's wrong with the current solution? Cost?
posted on: 20/07/2013 09:51:43

dave posted:

Its not the cost ? Think we need to look at. Other screens or club together and buy parts in bulk to get cheaper parts ? Think there's only trainspotter on ebay selling the screens ?
posted on: 20/07/2013 10:05:06

Dan posted:

Its not the cost ? Think we need to look at. Other screens or club together and buy parts in bulk to get cheaper parts ? Think there's only trainspotter on ebay selling the screens ?


Yep I'm up for that if you find a cheaper screen that can accommodate all the information we need to display as well as having some kind of input (physical buttons, touchscreen etc). It will still need a nano or other controller so the cost may not be as cheap as you would like.

Think we need to look at. Other screens or club together and buy parts in bulk to get cheaper parts ?


As I only had 10 boards and there isn't much interest in this modification anyway buying in bulk isn't necessary
posted on: 20/07/2013 10:30:27

dave posted:

So its me you and marra just doing this ?
posted on: 20/07/2013 11:00:05

dave posted:

Parts on order using this board as 12 v could I use the blue power terminals as used on the first board
posted on: 22/07/2013 17:47:48

Dan posted:

Parts on order using this board as 12 v could I use the blue power terminals as used on the first board


Is this the blank board? Yeah you can use that as 12V, you could use the blue power terminals the spacing is the same.
posted on: 22/07/2013 19:59:07

dave posted:

whoops ive ordered 1 of these on the bay IRFP450 N Channel Hexfet Power MOSFET
posted on: 23/07/2013 16:16:57

Dan posted:

whoops ive ordered 1 of these on the bay IRFP450 N Channel Hexfet Power MOSFET


They should be fine shouldn't they? Just check they've got the same pinout as the IRF530 ones.
posted on: 23/07/2013 16:38:07

dave posted:

It was over 4 quid for 1 not 1.58 lol
posted on: 23/07/2013 17:25:36

dave posted:

Got a relay from fezza he's going to av a go at doing a pod case

Can I use 330 k res instead of 3.9 k?
posted on: 24/07/2013 19:59:48

Dan posted:

Got a relay from fezza he's going to av a go at doing a pod case


Good stuff, you'll have to let us know how it goes.

Can I use 330 k res instead of 3.9 k?

3.9K only I'm afraid or your voltage measurements will be out.
posted on: 24/07/2013 20:04:00

dave posted:

Damm I'll pot in maplins onway home from wok in morning ordered two nanos from hong kong be here in 28 weeks
posted on: 24/07/2013 20:14:14

dave posted:

Just been to maplins in town what a waste of time back to ebay for the bits
posted on: 26/07/2013 15:42:19

dave posted:

Still waiting for nanos from china 11 quid for 2
posted on: 30/07/2013 11:27:41

Dan posted:

Still waiting for nanos from china 11 quid for 2


Yep cheap but you have to solder the pins on
posted on: 30/07/2013 17:02:09

dave posted:

Missed me dan been having trouble with karoo still waiting fot reed switch and nano from china
posted on: 05/08/2013 19:51:12

dave posted:

Could you not put a talking alarm with fob on this ? Got 1 in the shed but stopped working
posted on: 20/08/2013 20:34:25

dave posted:

Hey mate can you do a wiring diagram plz was going to take feed from the uni 8
posted on: 06/10/2013 15:37:29

Dan posted:

[quote=dave;1297]Hey mate can you do a wiring diagram plz was going to take feed from the uni 8 [/quote]

Hi Dave,

This block diagram should help you with the wiring, it's for 24v configurations only:


posted on: 13/10/2013 09:10:19

dave posted:

Cheers matey
posted on: 13/10/2013 09:51:05

dave posted:

Dan what fitting have you used on the x-pod case to hold the board thinking of putting uni behind the battery near on off switch on left side then wires from thatt to x-pod case and too the motor
posted on: 03/01/2014 13:58:30